Native UI and Postback
General UI like
<p>...</p>are supported on every chat platform, but you might want to use some special features on the specific platform. In this lesson, we'll learn how to use the native UI to provide richer experiences.Time to accomplish: 10 minutes
Native Component
On most chat platforms, you can interact with users by widgets or actions. In Machinat, they are available as Native Component of each platform.
Let's add a button in the message to list user's todos. Follow the
guide of the platform to edit handleChat:
- Messenger
- Telegram
- LINE
import Machinat, { makeContainer } from '@machinat/core';
import * as Messenger from '@machinat/messenger/components';
// ...
    async (
      ctx: ChatEventContext & { event: { category: 'message' | 'postback' } }
    ) => {
      const { event, reply } = ctx;

      if (event.type === 'text') {
        const matchingAddTodo = event.text.match(/add(\s+todo)?(.*)/i);
        if (matchingAddTodo) {
          const todoName = matchingAddTodo[2].trim();
          return reply(
            <>
              <p>Todo "<b>{todoName}</b>" is added!</p>
              <Machinat.Pause time={1500} />

              <Messenger.ButtonTemplate
                buttons={
                  <Messenger.PostbackButton
                    title="Show Todos 📑"
                    payload={JSON.stringify({ action: 'list' })}
                  />
                }
              >
                You have <b>{3}</b> todos now.
              </Messenger.ButtonTemplate>
            </>
          );
        }
      }
// ...
The tags like Messenger.ButtonTemplate are Native Components.
They represent special features that belong to the Messenger platform only.
We use these Messenger native components above:
Messenger.ButtonTemplate- sends a text message with buttons.Messenger.PostbackButton- a button to post thepayloadback.
import Machinat, { makeContainer } from '@machinat/core';
import * as Telegram from '@machinat/telegram/components';
// ...
    async (
      ctx: ChatEventContext & { event: { category: 'message' | 'postback' } }
    ) => {
      const { event, reply } = ctx;

      if (event.type === 'text') {
        const matchingAddTodo = event.text.match(/add(\s+todo)?(.*)/i);
        if (matchingAddTodo) {
          const todoName = matchingAddTodo[2].trim();
          return reply(
            <>
              <p>Todo "<b>{todoName}</b>" is added!</p>
              <Machinat.Pause time={1500} />

              <Telegram.Text
                replyMarkup={
                  <Telegram.InlineKeyboard>
                    <Telegram.CallbackButton
                      text="Show Todos 📑"
                      data={JSON.stringify({ action: 'list' })}
                    />
                  </Telegram.InlineKeyboard>
                }
              >
                You have <b>{3}</b> todos now.
              </Telegram.Text>
            </>
          );
        }
      }
// ...
The tags like Telegram.Text are Native Components.
They represent special features that belong to the Telegram platform only.
We use these Telegram native components above:
Telegram.Text- sends a text message with more options.Telegram.InlineKeyboard- attach inline buttons below a message.Telegram.CallbackButton- a button to post thedataback.
import Machinat, { makeContainer } from '@machinat/core';
import * as Line from '@machinat/line/components';
//...
  async (
    ctx: ChatEventContext & { event: { category: 'message' | 'postback' } }
  ) => {
    const { event, reply } = ctx;

    if (event.type === 'text') {
      const matchingAddTodo = event.text.match(/add(\s+todo)?(.*)/i);
      if (matchingAddTodo) {
        const todoName = matchingAddTodo[2].trim();
        return reply(
          <>
            <p>Todo "<b>{todoName}</b>" is added!</p>
            <Machinat.Pause time={1500} />

            <Line.ButtonTemplate
              altText="You have 3 todos now."
              actions={
                <Line.PostbackAction
                  label="Show Todos 📑"
                  data={JSON.stringify({ action: 'list' })}
                />
              }
            >
              You have <b>{3}</b> todos now.
            </Line.ButtonTemplate>
          </>
        );
      }
    }
// ...
The tags like Line.ButtonTemplate are Native Components.
They represent special features that belong to the LINE platform only.
We use these LINE native components above:
Line.ButtonTemplate- sends a text message with buttons.Line.PostbackAction- a button to post thedataback.
info
If you are building a cross-platform app, reply according to the platform like:
//...
    <>
      <p>Todo "<b>{todoName}</b>" is added!</p>
      <Machinat.Pause time={1500} />

      {
        event.platform === 'messenger' ? (
          // messenger component
        ) : event.platform === 'telegram' ? (
          // telegram component
        ) : (
          <p>You have <b>{3}</b> todos now.</p>
        )
      }
    </>
//...
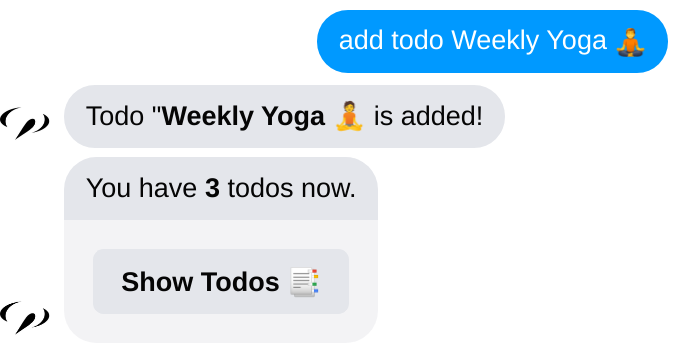
Now a button should be attached on the replied message, like:
JSX Props
The attributes we put on the JSX element are Props. For example:
    <Messenger.ButtonTemplate
      buttons={
        <Messenger.PostbackButton
          title="Show Todos 📑"
          payload={JSON.stringify({ action: 'list' })}
        />
      }
    >
      You have <b>{3}</b> todos now.
    </Messenger.ButtonTemplate>
Props are used to pass values to the component. The value can be text (like title),
expression (like payload) or even another JSX element (like buttons).
The JSON encoded data { action: 'list' } is set on the button.
We can use the data later to handle the postback event.
Postback Event
When the user taps the button, it triggers an event that posts the data back.
We can handle it by adding these codes in handleChat:
//...
  (getIntent, getUserProfile) =>
    async (
      ctx: ChatEventContext & { event: { category: 'message' | 'postback' } }
    ) => {
      const { event, reply } = ctx;
      const intent = await getIntent(event);

      if (intent.type === 'list') {
        return reply(
          <>
            <p>You have <b>3</b> todos:</p>
            <p>......</p>
          </>
        );
      }
//...
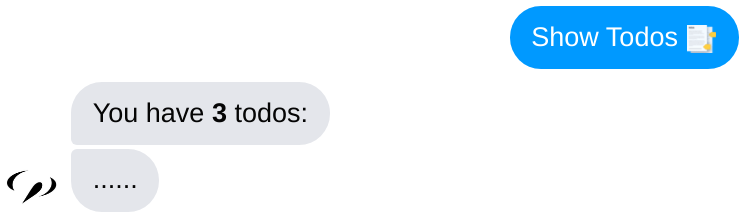
Try tapping the Show Todos 📑 button and you should see:
Handle Data
To know what happen in the getIntent function,
check the src/services/useIntent.ts file and you'll see the following code:
- Messenger
- Telegram
- LINE
//...
if (
  event.platform === 'messenger' &&
    (event.type === 'quick_reply' || event.type === 'postback')
) {
  if (event.data) {
    const { action, ...payload } = JSON.parse(event.data);
    return {
      type: action,
      confidence: 1,
      payload,
    };
  }
}
//...
The 'postback' event contains the data { action: 'list' } we attached on the button.
We can get the data at event.data and reply according to it.
//...
if (event.platform === 'telegram' && event.type === 'callback_query') {
  if (event.data) {
    const { action, ...payload } = JSON.parse(event.data);
    return {
      type: action,
      confidence: 1,
      payload,
    };
  }
}
//...
The 'callback_query' event contains the data { action: 'list' } we attached on the button.
We can get the data at event.data and reply according to it.
//...
if (event.platform === 'line' && event.type === 'postback') {
  if (event.data) {
    const { action, ...payload } = JSON.parse(event.data);
    return {
      type: action,
      confidence: 1,
      payload,
    };
  }
}
//...
The 'postback' event contains the data { action: 'list' } we attached on the button.
We can get the data at event.data and reply according to it.
Our bot can interact with users using buttons and postback. Next, we'll learn how to make a reusable UI with a component.